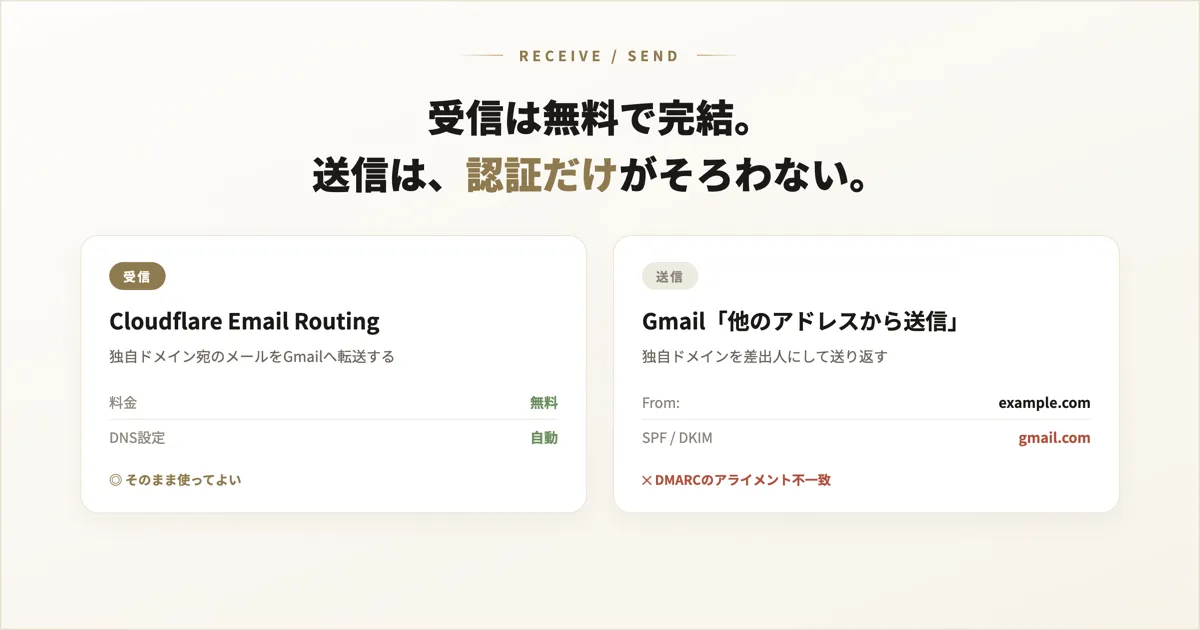
There are plenty of situations where you want to use email on a custom domain (for example, [email protected]) inside Gmail without paying any mailbox fee at all. Trying this in practice with the combination of Cloudflare and Gmail, it turned out that “receiving” and “sending” work by entirely different mechanisms, and that the difficulty of the two differs greatly. This article organizes the procedure, along with the reason why—by the very principles of email authentication—only the sending side inevitably requires a compromise, based on the official documentation and the definitions in the RFCs.
Conclusion — Receiving is entirely free, and sending works too, but authentication alone requires a compromise
- Receiving is easy and reliably closes out for free. Cloudflare Email Routing forwards mail addressed to your domain to your existing inbox (Gmail). It is free to use, and the necessary DNS records are created automatically. That said, the volume is not unlimited: according to the list of Email Routing limits, routing rules (custom addresses) are capped at 200 per domain, and verified destination addresses are also capped at 200 per account.
- Sending is possible for free, but one structural constraint remains. With Gmail’s Send mail as, you can send with your custom domain as the sender. However, a personal Gmail account cannot apply a DKIM signature for your own domain, so from the custom domain’s perspective DMARC authentication cannot, in principle, line up. If you set a strict DMARC policy on the custom domain (such as
p=reject) without understanding this, the mail you send yourself can be rejected by your own domain’s policy.
In other words, the premise of “putting custom-domain email on Gmail for free” is correct, and the 200 limit is not a problem within the range of personal use. On top of that, only the authentication on the sending side requires a compromise—and that is the theme of this article.
The big picture: receiving and sending are separate things
Email has an independent “path for receiving” and “path for sending.” In this setup, the two are handled by different services.
| Handled by | Cost | Difficulty | |
|---|---|---|---|
| Receiving | Cloudflare Email Routing (forwarding) | Free | Low |
| Sending | Gmail “Send mail as” + Gmail SMTP | Free | Medium (requires understanding authentication) |
Cloudflare Email Routing is explicitly dedicated to receiving (forwarding), and you cannot send mail from this feature itself (Email routing rules and addresses). So sending is left separately to Gmail. Below, we assemble it in the order of receiving → sending → authentication.
1. Building the receiving side (Cloudflare Email Routing)
Prerequisites
Email Routing requires that the domain’s DNS is managed by Cloudflare (that the nameservers point to Cloudflare) (Email Routing — Cloudflare). If you have not added your domain to Cloudflare, first complete the nameserver transfer.
Setup steps
- In the Cloudflare dashboard, select the target domain and open Email Routing.
- Register the Gmail address into which you want to consolidate receiving as a Destination Address. Cloudflare sends a confirmation email, so complete verification by clicking the link in your Gmail inbox. Routing rules are not activated until verification is complete (to prevent spam abuse).
- Create a Routing Rule. Link a custom address such as
[email protected]to your verified Gmail (Email routing rules and addresses). - When you enable Email Routing, Cloudflare automatically adds the MX, SPF, and DKIM DNS records (Domain configuration). Note that this automatically added SPF/DKIM is solely for correctly authenticating the forwarding path (it is not for sending).
Features worth remembering
- Catch-all: You can route everything addressed to that domain—including addresses whose local part does not exist—into a single inbox. It is handy for rescuing typos, but it also picks up all the spam, so operate it carefully (Email routing rules and addresses).
- Subaddressing (plus addressing): You can handle
+-tagged addresses like[email protected]in conformance with RFC 5233. Everything after the+is ignored and received under theuser@rule, while it can be used to identify purpose in logs or Workers. - Worker integration / Drop: You can process received mail programmatically with a Worker, or discard mail addressed to a specific address (making it appear to exist while throwing it away).
Pitfalls
- When you enable Email Routing, that domain’s MX points to Cloudflare. If you later bring Google Workspace or Microsoft 365 onto the same domain, the new MX they issue overwrites Cloudflare’s MX and forwarding stops. When switching mail providers, either disable Email Routing first or be mindful of MX priority (Domain configuration).
- Because this is receive-only, if you reply directly from Gmail the sender will be
@gmail.com. Your personal address becomes visible to the recipient. To make this appear as the custom domain, you need the sending setup that follows.
At this point, “receiving” closes out entirely for free. This is likely enough for many people.
2. Building the sending side (Gmail’s “Send mail as”)
Gmail has a “Send mail as” feature that lets you send with another address you own as the sender. We use this to make [email protected] the sender.
Preparation: two-step verification and app passwords
To use a personal Gmail account as a sending server, you need to pass credentials to Gmail’s external SMTP (smtp.gmail.com). For that:
- Enable two-step verification (2-Step Verification) on your Google account.
- Issue an app password (
myaccount.google.com/apppasswords). The app password item does not appear unless two-step verification is enabled.
This app password becomes the password for SMTP authentication.
Setup in Gmail
- In Gmail, go to Settings → Accounts and Import → Send mail as and click “Add another email address.”
- Enter the name and the custom domain address you want as the sender (
[email protected]). - Enter the SMTP server information:
- SMTP server:
smtp.gmail.com - Port:
587(TLS) or465(SSL) - Username: your
[email protected](note: the Gmail address, not the custom domain) - Password: the app password you just issued
- SMTP server:
- To confirm ownership, Gmail sends a confirmation code to
[email protected].
Here is where the receiving setup pays off. The confirmation code arrives at [email protected] and is forwarded to your Gmail via Cloudflare Email Routing. Entering the code passes the ownership check, and the loop of receiving and sending closes. From then on, you can choose the custom domain in the From field on Gmail’s compose screen.
3. The crux: why only “sending” is tricky for authentication
This is the part of the article that requires the most precision. The setup above works. But “email authentication from the custom domain’s perspective” cannot, in principle, line up. Let me explain the reason by returning to the definitions of SPF, DKIM, and DMARC.
SPF does not look at the “From header”
What SPF (Sender Policy Framework, RFC 7208) authenticates is the SMTP envelope sender (MAIL FROM / Return-Path) and the HELO identity—not the From: header that the recipient sees on screen. RFC 7208 itself states that verifying identities other than these two with SPF is “NOT RECOMMENDED.”
When you send via smtp.gmail.com, the sending infrastructure is Google, so the envelope sender (Return-Path) is your @gmail.com. Therefore SPF verifies that “a Google server is sending under the name gmail.com,” and it passes as gmail.com. Even though the visible sender is [email protected], that is not what SPF is checking against.
DKIM becomes a “gmail.com signature”
DKIM (DomainKeys Identified Mail, RFC 6376) is a mechanism in which the sending side signs a message with a private key, and the receiving side verifies it with the public key in the DNS of the domain indicated by d=. Gmail signs outgoing mail with d=gmail.com. In a personal Gmail account, you cannot configure a DKIM private key for your custom domain (example.com) into Gmail’s SMTP. DKIM signing on a custom domain is a feature of Google Workspace (paid).
The “alignment” that DMARC requires does not line up
The central concept of DMARC (RFC 7489) is Identifier Alignment. Quoting the definition in RFC 7489 (section 3.1) directly, it states that identifier alignment exists when the domain of the RFC5322.From address matches a domain that was verified by SPF or DKIM (or both). For DMARC to pass, either SPF or DKIM must “pass and be aligned with the From domain.”
Applying this to the setup:
| Item | Actual value | Matches example.com in From? |
|---|---|---|
From: (the sender a person sees) | [email protected] | — |
| Domain SPF verifies (Return-Path) | gmail.com | No match |
Domain of DKIM signature (d=) | gmail.com | No match |
SPF passes as gmail.com, and DKIM passes as gmail.com too. But neither is aligned with example.com. As a result, from example.com’s perspective, DMARC fails.
What this means in practice
How a DMARC failure is treated is determined by the DMARC policy (p=) that the domain publishes.
- When
example.comhas no DMARC set /p=none: Most receiving sides let the mail through. As daily operation, it is delivered (though some receivers may become stricter about spam judgment). - When
example.comhasp=quarantine/p=rejectset: The receiving side may quarantine or reject as per the policy. That is, a self-contradiction arises in which the anti-spoofing measure you applied to your own domain rejects the mail you sent from your own Gmail.
Therefore, if you adopt this free setup, the realistic solution is not to make the custom domain’s DMARC strict (keep it at p=none, or place no DMARC record at all). “Being able to send for free” and “strictly authenticating the custom domain” cannot coexist in this setup.
Note: traces visible to the recipient
- Depending on the recipient’s mail software, “via gmail.com” may be displayed next to the sender.
- The Gmail address used for sending remains in the mail’s source headers (Return-Path, etc.). It can be traced by a technically minded recipient.
4. Options when you want to do it “properly”
If you want to operate DMARC strictly and make anti-spoofing measures effective, you need to prepare a sending path that can apply a DKIM signature on the custom domain. If the compromise of the free setup is not acceptable, consider the following.
- Use a DKIM-capable external SMTP relay (free tier available): Mail delivery services such as Brevo authenticate the custom domain with DKIM/SPF and then provide an SMTP relay. If you put that relay (e.g.,
smtp-relay.brevo.com) and the issued credentials into Gmail’s SMTP server field, you can send with alignment holding on the custom domain, and DMARC is satisfied as well. Note that the free tier has a cap on the number of messages sent. - Google Workspace (paid): You can properly unify sending and receiving, including DKIM signing on the domain. It is a monthly charge, but in terms of authentication and operation it is the most straightforward.
- Cloudflare Email Sending (for apps): Separate from the receiving Email Routing, Cloudflare also has Email Sending, which sends from a domain via Workers, REST API, or SMTP. However, this is primarily aimed at sending transactional mail from an application, and its design philosophy differs from the everyday “reply” use on the Gmail screen.
Summary
- Receiving mail addressed to a custom domain in Gmail closes out entirely for free with Cloudflare Email Routing (though both routing rules and destination addresses are capped at 200)
- Sending from Gmail with a custom domain as the sender can also be done for free (Gmail’s “Send mail as” + an app password)
- Passing the custom domain’s DMARC on sent mail is impossible with a personal Gmail. The reason is that you cannot apply DKIM on your own domain
- Therefore, imposing a strict DMARC (
p=reject) on the custom domain fits poorly with this setup and carries the risk of your own sending being rejected
For receiving, this is a setup you can adopt without hesitation via Cloudflare Email Routing. Sending, too, can be achieved for free with Gmail’s “Send mail as.” However, on the sending side—by the very principles of email authentication, in which SPF looks at the envelope sender, DKIM at the d= domain, and DMARC at the alignment of both with From—the custom domain’s authentication does not line up. It comes down to a judgment call: use it with an understanding of this compromise, or step up to a DKIM-capable sending path.
References
- Email Routing — Cloudflare
- Limits — Cloudflare Email Service docs (both routing rules and destination addresses are capped at 200)
- Email routing rules and addresses — Cloudflare Email Service docs
- Domain configuration — Cloudflare Email Service docs
- Send emails from a different address or alias — Gmail Help
- Send emails — Cloudflare Email Service docs (sending via Workers, REST API, and SMTP)
- RFC 7208 — Sender Policy Framework (SPF)
- RFC 6376 — DomainKeys Identified Mail (DKIM) Signatures
- RFC 7489 — Domain-based Message Authentication, Reporting, and Conformance (DMARC) (identifier alignment is in section 3.1)
- RFC 5233 — Sieve Email Filtering: Subaddress Extension